Traditional BBQ Styles for the Home Enthusiast
Before my wife and I started Big Jerk Soda Company, I spent 19 years, on and off, cooking professionally. I worked in a variety of kitchens preparing everything from Shepherd’s pie to Japanese ramen. My journey into traditional BBQ styles, however, didn’t really begin until years after I had left my career in the kitchen behind.
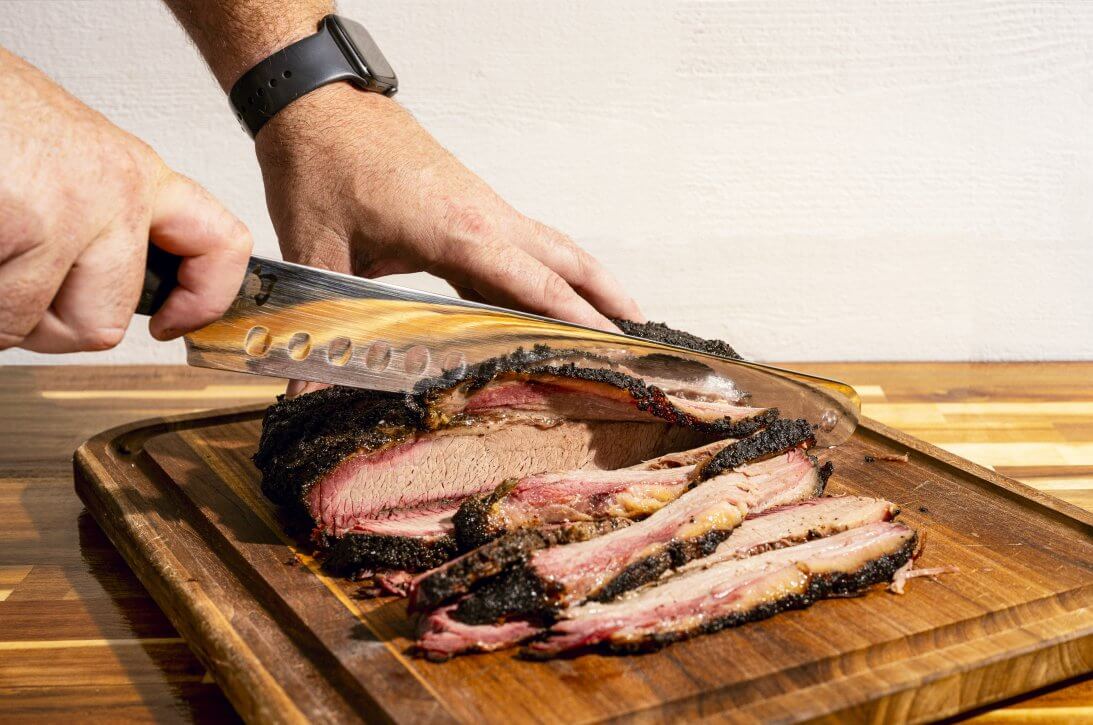
The first time I ever cooked a Texas-style smoked brisket was a few months into the pandemic. I had used part of my stimulus check to purchase a combination gas grill and smoker. I organized a socially distanced “bring your own kiddie pool” party in my backyard with a handful of friends and set about the task of following James Beard Award-winning Pitmaster Aaron Franklin’s guidance on the best way to smoke a brisket. After about 15 hours of fighting my new smoker, the brisket was ready for slicing.
The four or five people that stuck out the long wait were treated to the fruits of the day’s toil. I unwrapped the inaugural brisket on a cutting board on my patio table in the dark and began to slice. With every slice, a hand would reach out from the darkness and vanish. No sides, no buns, no sauces—just meat straight from the cutting board and into the mouths of friends gathered around me. In a matter of minutes, more than half the brisket was gone—15 hours of work inhaled in less time than it took to enjoy the first beer of the day.
Since then, I have learned how to use my grill more efficiently and BBQing has become something of a meditative endeavor for me. The act of dedicating a day and a half to the pursuit of a few perfectly cooked pieces of meat may sound like madness to some, but for me, it’s a form of tribute that honors one of our most ancient achievements as humans—cooking with fire.
CHOOSING YOUR CUTS
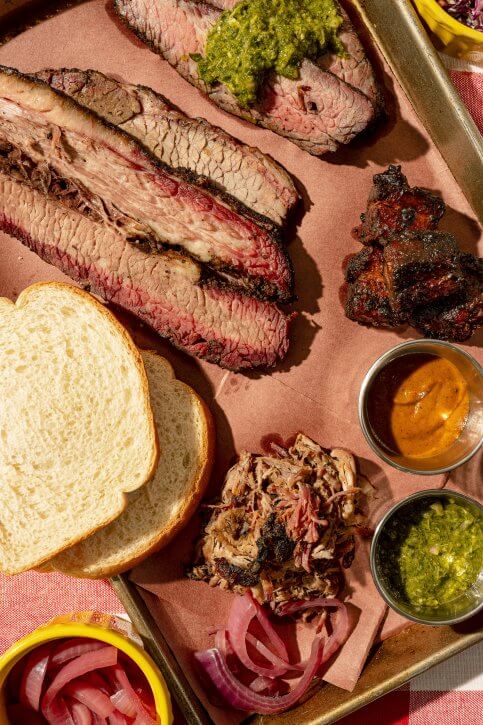
I typically pick cuts of meat that some may find unapproachable, but they are pound-for-pound less expensive and they offer a huge payoff when you take your time with them. For this article, I went with Texas-style brisket, Carolina-style pulled pork butt, tri-tip roast and pork belly burnt ends—all with traditional accompaniments.
One of the other reasons I chose all these items is that they can all be cooked in the same temperature range. When I cook low and slow, I try to keep my smoker in the 220-280° F range. I am not skilled or dedicated enough to keep my hot box at an exact temperature, but that range has yielded fantastic results and made it so that I am not getting up every five minutes to tend to the fires.
MEAT PREP
The first thing you’ll want to do is prep your meat the day before. Prepping the brisket is the most time-consuming because it needs a lot of trimming with a very sharp knife. I still use Aaron Franklin’s Meat Smoking Manifesto cookbook as a resource every time I trim, but the internet is full of other resources as well. Once the meat is trimmed, it’s time for a slather and a rub. Coat the meat in something wet like vinegar or mustard so that your rub will stick. Next, cover your meat in a generous coating of your favorite dry rub. Clear a shelf in the fridge and throw it in until the morning of your BBQ.
TOOLS, SUPPLIES & SETUP
For longer cook times, it’s essential to set up your grill and have everything you need prepped and on hand well in advance. My checklist includes natural lump coals, hardwood of choice, a hatchet for chopping wood, charcoal chimney, BBQ lighter, grill scraper, an aluminum cake pan full of water, a spray bottle full of apple cider vinegar, a meat thermometer and two sets of tongs.
First, remove the grill grates and place your small pan of water at the bottom of your grill. When your fire is rolling, the pan will steam and help keep your meat from drying out. Next, replace the grates, light a couple of handfuls of lump charcoal and then add them to your fire pit. I use a charcoal chimney which allows you to quickly light the coals. When the coals are white around the edges and starting to heat up, throw a few small split pieces of wood on top and close the lid. As the fire starts, you’ll notice billows of white smoke. White smoke imparts bad smells and flavors and indicates that your fuel isn’t burning properly. Once the white smoke turns a blueish color or disappears completely and your temperature looks right, you’re ready to cook.
GET COOKING
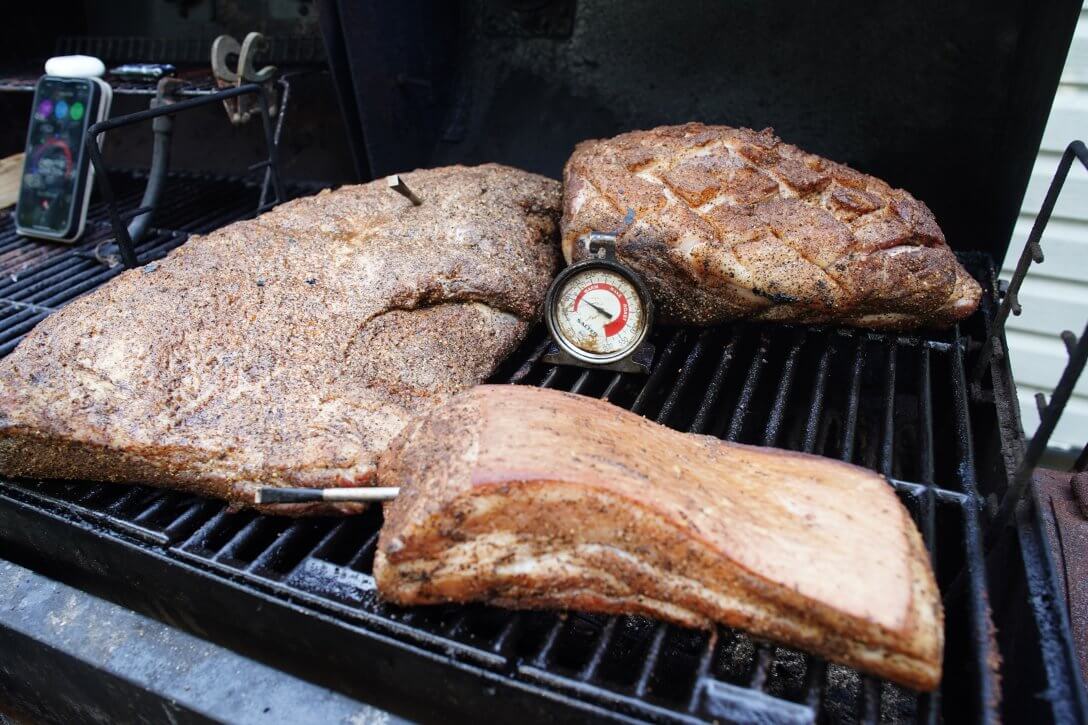
Scrape the grill and arrange your meat as far from direct heat as you can. Only the brisket and pork butt need to go on at this point in the day. You’ll have the whole day to make your sides and accompaniments while the larger cuts of meat cook. The tri-tip and burnt ends can go on as desired, keeping in mind that the burnt ends will take about three hours to smoke and then another hour to chop into chunks, toss in the sauce and finish. The tri-tip only takes a couple of hours. I like to put the pork belly on when I start around 8 am so I have burnt ends for lunch. Once everything is in its place, give it a little spritz of cider vinegar, say goodbye and shut the lid.
The old adage says “If you’re lookin’, you ain’t cookin’.” Every time you open the lid to your grill or your heat source, you are losing heat and adding time to your cook. This is one of the main reasons I like my temperature range of 220 to 280 degrees. When the grill cools to the low end of your range, light another chimney full of charcoal. When the coals are ready, open the firebox and toss them in along with another couple of pieces of hardwood. Leave the box open while the wood catches fire. Once it’s completely on fire, close the box.
The fire from the wood will raise the temp of your cooking chamber considerably and probably take you over the high end of your temperature range. This is the perfect time to quickly open your smoker to check on things inside. I typically rotate whatever I’m cooking 180 degrees so that one side is never taking the brunt of the higher heat coming from the offset. Close the lid again and monitor your temperature carefully for the next few minutes. If the wood is still burning too hot, you can crack the lid to your firebox to allow some of the heat to escape before it enters the cooking chamber. Once the heat in the grill settles around the high end of your range, close the lid all the way again and go on about your day. Check your ambient temperature every 15 minutes or so until you see temps reaching the low end of your range. When this happens, simply repeat the steps above to help bring your temp back up.
For the rest of the day, this will be all you do. If you monitor your temps, maintain your fire and wait patiently for your internal temperature to reach 203 degrees for brisket, pork belly or pork shoulder, you will have a successful cook. One thing worth mentioning is “the stall.” For hours you are going to watch your meat’s internal temperatures rise quickly, but just when it seems you might be ahead of schedule, the temps will cease climbing for a few hours. Relax, there is nothing you can do about it and it will pass…eventually.
This is usually the point in the cook where I remember that I’m going to be hungry long before the brisket finishes. The burnt ends for lunch were long gone, so I pulled out my pre-seasoned tri-tip and placed it on the smoker with a thermometer probe to monitor the cook. After a couple of hours on the grill at low temps, the tri-tip’s internal temperature had reached my desired temp of 135 degrees. Now it’s time to let the meat rest and cool. Cooling will allow you to get a better sear and crust on the outside without overcooking on the inside. Slowly cooking the meat and then searing the outside is called the reverse sear. Whatever method you use to sear, be sure your heat source is roaring hot. You want to be able to get a good crust in around 60 seconds per side. You should be left with a nice dark brown crust on the outside and still have a beautiful pink inside. After searing, I sliced mine and covered it in a delicious chimichurri.
Thanks to some thunderstorms in the middle of the day that slowed things down, plus the stall, the sun was going down and after more than 15 hours of cooking, I was still hours away from finished meat. I decided to employ a “cheater” method that has been helpful for me when I want BBQ but I don’t have a full day to smoke.
I pulled the brisket and the pork butt, wrapped them in butcher paper, set the oven in my house to 280 degrees (real temp closer to 250 degrees according to my thermometer), and put the meat into the safety of a controlled and hands-off environment. Most of what I’ve read indicates that at a certain point the meat is no longer absorbing any more smoke flavor. That being the case, oven finishing is a great way to end a cook.
After three more hours in the oven, my pork and beef had reached the desired internal temperature of 203 degrees. When you hit your temperature, it’s time for the final step—resting the meat. There are many techniques, but I recommend turning off the oven and opening the door to let some heat out, then closing it again and letting the meat sit in the oven for an hour. Resting finishes the long process of tenderizing a tough piece of meat as well as allowing the meat to retain its moisture.
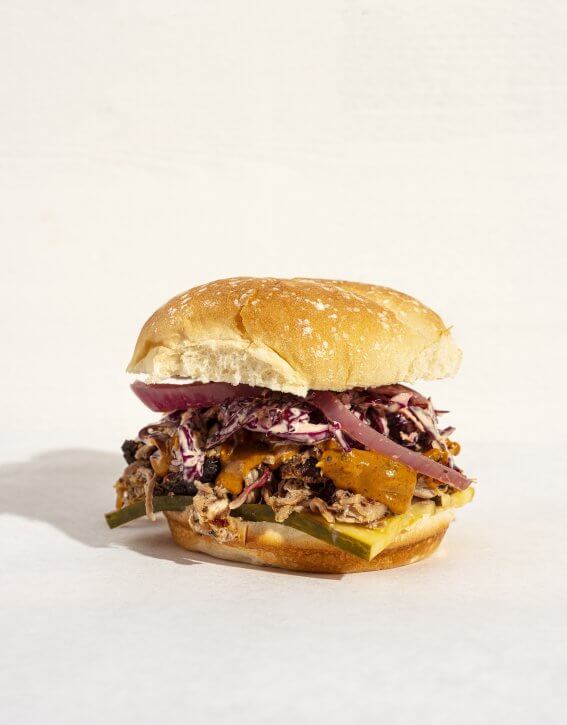
To finish the pork, shred it with forks or tongs then add about a half cup of vinegar and some red pepper flakes. My favorite way to eat it is on a soft bun with mustard BBQ sauce, pickles and purple coleslaw. It is truly a fantastic sandwich.
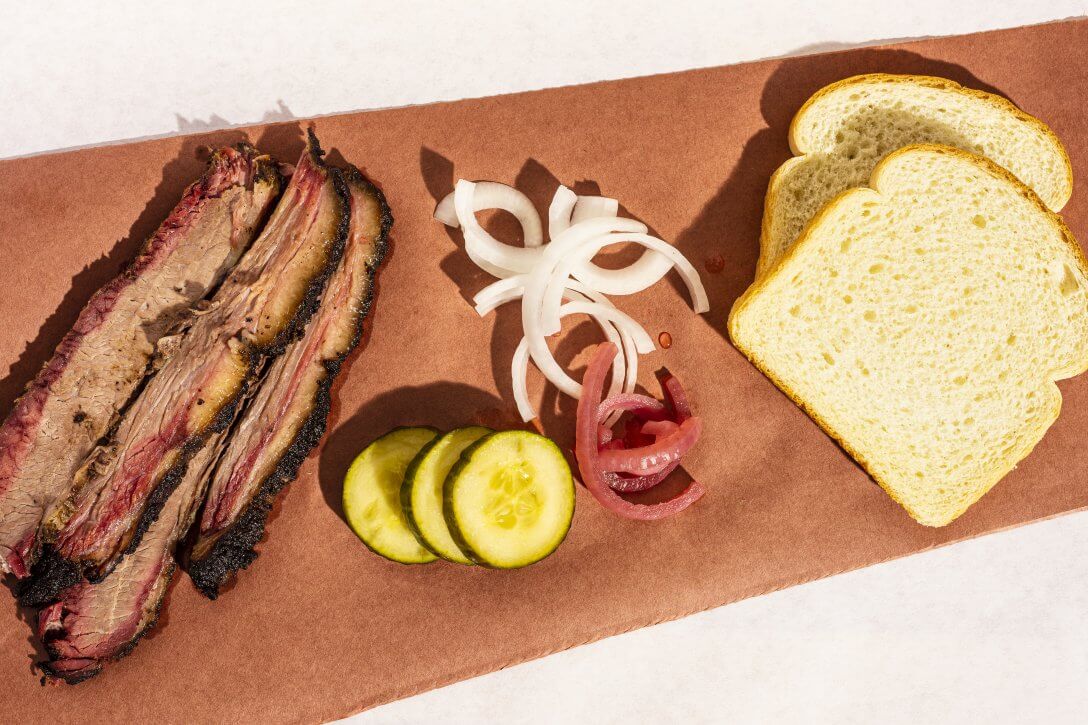
So, now it’s midnight. My wife is asleep and the brisket is done four hours behind schedule. I grab a jar of pickles that I made the night before, fresh white onion, and some spicy mayo. I slice a fat piece off of the point side of the brisket and place it on a flour tortilla with the pickles, onion and mayo, fold it in half and wolf it down in about three bites. The day was long and hard, but the reward was this quiet moment alone, feeling accomplished and exhausted enjoying what I worked so hard on. I am my own biggest critic, but I am certain this is by far my best brisket to date and maybe in the top five I’ve ever eaten. Now, I can finally sleep with a full belly and a sense of pride that, for me, only comes from applying what I learned after a lifetime of cooking. Some things take a long time to become something special, but when they do, they’re worth immeasurably more than what was put into them.